Geotagged Photos: How to Prove You Were at the Property (And Why It Matters More Under UAD 3.6)
Somewhere in a state appraiser regulatory board's filing cabinet, there's a complaint about an appraiser who didn't actually visit the property. Maybe they used old photos. Maybe they drove by and never went inside. Maybe they never drove by at all.
These complaints are rare. But they happen. And when they do, the first question the board asks is: can you prove you were there?
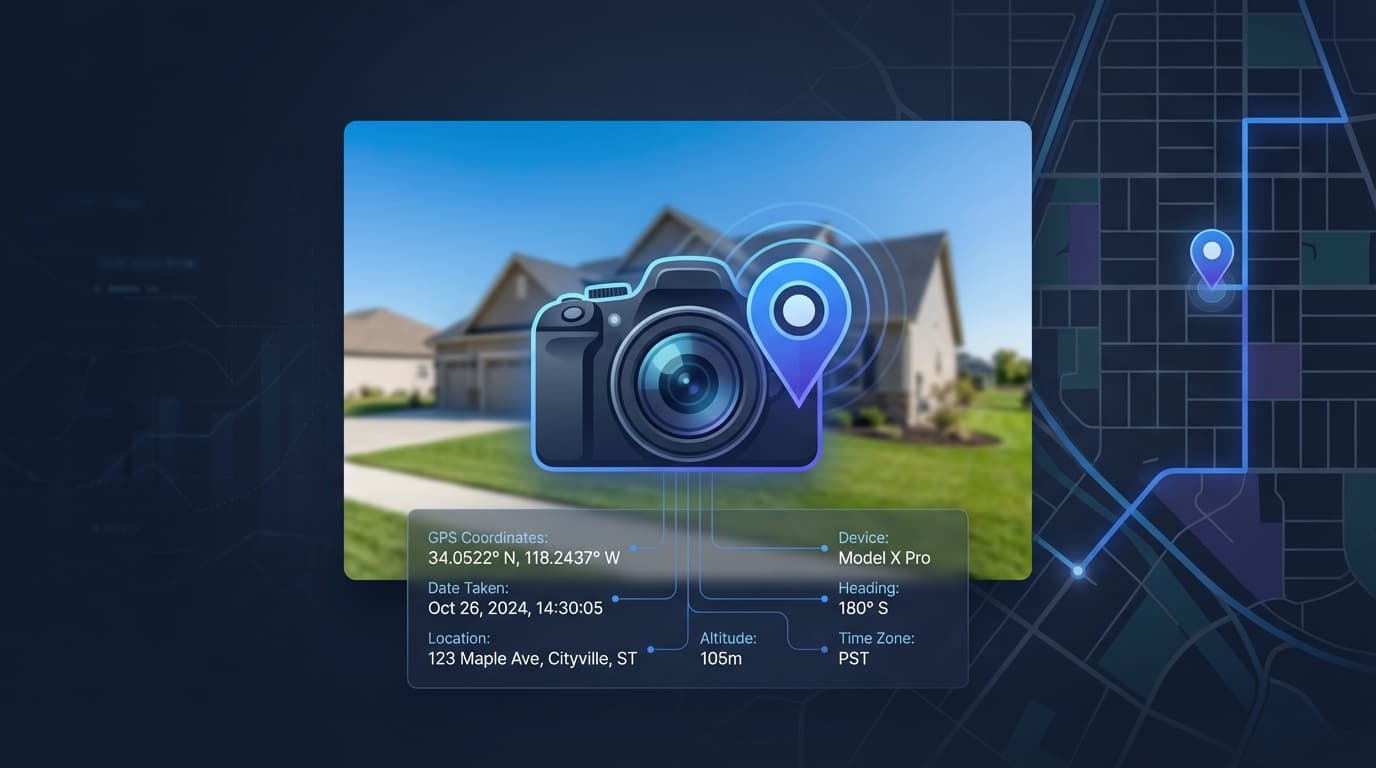
If your inspection photos have geolocation data embedded - latitude, longitude, and timestamp - the answer is immediate and verifiable. You were at these coordinates, on this date, at this time. Here are the photos you took. The metadata doesn't lie.
If your photos don't have geolocation data, the answer is "trust me, I was there." Which is fine until someone challenges it.
Geotagging inspection photos isn't complicated. It's not expensive. And with UAD 3.6 requiring organized, section-specific photo packages, the appraisers who aren't doing it are creating unnecessary risk for themselves at the exact moment the industry is tightening documentation requirements.
What Geotags Actually Are
Every smartphone camera can embed location data in the photos it takes. When you take a photo with your phone's camera and location services are enabled, the image file includes metadata: GPS coordinates (latitude and longitude), a timestamp (date and time), and sometimes altitude and compass direction.
This metadata is called EXIF data, and it's embedded in the image file itself. It travels with the photo everywhere - when you email it, upload it, or include it in a report. Anyone who knows how to check (and any automated system designed to verify) can confirm where and when the photo was taken.
For appraisers, this means every inspection photo can serve as verifiable proof of presence. Not "I was there because I said so." "I was there because the GPS coordinates in these 40 photos place my phone at this property address on this date between 10:15 AM and 11:02 AM."
Why This Matters More Now
Three trends are converging to make geotagged photos more important than they've been historically.
UAD 3.6 requires organized photo packages. Under the new format, photos must be organized by topic - site, exterior, interior rooms, additional structures. The report is delivered as a ZIP package containing the XML data, a PDF, and all photos. The days of dumping 30 unorganized photos into an addendum are ending. Organized, properly tagged photos are a compliance requirement.
AMC quality reviews are getting more automated. AMCs and lenders are increasingly using automated systems to review submitted reports. These systems can check photo metadata - geolocation, timestamps, consistency between reported inspection date and photo dates. If your photos don't have geotags, they can't be verified automatically. That doesn't trigger a rejection necessarily, but it does trigger additional scrutiny in some systems.
State regulatory boards take compliance seriously. In the rare event of a complaint about inspection quality, geotagged photos are your best defense. They prove presence at the property, document the date and time of inspection, and create an unambiguous record that you were physically where you said you were.
The Photo Workflow Under UAD 3.6
Under the new reporting format, your photo package needs to be organized by section. Here's the practical workflow that combines geotagging with UAD 3.6 compliance:
At the property: Take photos with your phone's camera with location services enabled. Photograph the exterior (front, rear, street scene), every interior room, any notable features (updates, damage, ADUs, outbuildings), site features, and views from the property. Take more photos than you think you'll need - it's easier to exclude extras than to realize you missed the bathroom ceiling two hours later.
Between inspections or at your desk: Sort the photos into report sections. Exterior front, exterior rear, site, kitchen, bathroom 1, bathroom 2, living room, additional structures, and so on. Tag each photo with the section it belongs to and any condition/quality observations.
Before submission: Verify the photo package is complete. Every required section has photos. The photos are correctly tagged and ordered. The metadata confirms the correct property and date.
This sorting and tagging step is where most appraisers lose time. Manually organizing 40 photos into 15+ categories while remembering which bathroom was which takes 20-30 minutes per report. More if the property was large or complex.
The Photo Analyzer in Appraiser Machine automates the classification step. Upload your inspection photos and the AI sorts them by section - exterior, kitchen, bathroom, site features - with condition and quality suggestions based on what it sees in the image. You review the classifications, adjust anything the AI got wrong, and your photo package is organized in minutes instead of a half hour.
The geotag data flows through automatically. Every photo retains its original EXIF metadata - GPS coordinates, timestamp, direction. That data becomes part of your inspection documentation without any additional steps from you.
Geotagged Photo Verification: The Automatic GPS Check
It's one thing for your photos to carry EXIF metadata. It's another to confirm that the metadata actually matches the property on the order. Photos can be mislabeled. The wrong folder can get attached. On a busy day with three inspections, it's not impossible to drop a Kitchen photo from 123 Oak St into the package for 456 Elm Ave.
Geotagged Photo Verification (shipped in April 2026 inside Appraiser Machine) runs that check for you automatically. When you upload inspection photos to an order, the system reads the embedded GPS coordinates on every photo and compares them against the subject property's address. Photos whose coordinates fall within the expected radius of the property get a green verified badge. Photos that don't — because the EXIF data is missing, because location services were off, or because the photo was taken somewhere else — get flagged so you can decide whether to re-shoot, explain, or remove them before submission.
The practical result: by the time the report leaves your desk, every photo in the package has either been geo-verified or explicitly acknowledged. You don't have to remember to check. The system checks and tells you where to look if something's off. In a dispute, you have automated proof that your photo package came from the property — not just your word that it did.
How to Make Sure Your Phone Is Geotagging
Most smartphones geotag photos by default, but it's worth confirming.
iPhone: Open Settings → Privacy & Security → Location Services → Camera. Make sure it's set to "While Using." If location services for Camera are turned off, your photos won't have geotags.
Android: Open your camera app → Settings → look for "Location tags" or "GPS tags" or "Store location." Enable it. The exact location varies by manufacturer, but the setting is in every modern Android camera app.
Quick test: Take a photo, then view the photo details (iPhone: tap the info button; Android: tap details or properties). If you see GPS coordinates or a map location, geotagging is working. If you don't, check the settings above.
If you've been using a separate camera (not your phone) for inspections, those photos typically won't have geolocation data unless the camera has GPS built in. Switching to your phone camera for at least the key compliance photos (exterior, front door, property identification) ensures geotag documentation for those critical images.
The Defensibility Angle
Most appraisers will never face a complaint about inspection quality. But the ones who do will wish they had geotagged photos.
A geotagged photo of the property exterior, taken at the time of inspection, is objective evidence that you were at the property. A set of 40 geotagged interior photos is proof that you conducted a thorough interior inspection. The timestamp sequence (10:15 AM arrival, 11:02 AM departure) documents how long you spent at the property.
Compare that to an appraiser whose photos have no metadata. They can describe the inspection. They can show photos of the property. But they can't prove when or where those photos were taken. In a dispute, "trust me" is a weaker position than "here's the GPS data."
This is also relevant for the revision request dynamic. If a reviewer questions whether you actually inspected a specific feature, geotagged photos with timestamps are stronger documentation than a narrative assertion. (More on the UAD 3.6 revision dynamics here.)
The 2-Minute Change That Protects You
If you're not currently geotagging your inspection photos, the fix takes about 2 minutes: check your phone's camera settings, enable location services for the camera app, and take one test photo to confirm it's working.
From that point forward, every inspection photo you take carries embedded proof of when and where it was taken. No extra steps during the inspection. No extra cost. Just a phone setting that creates a defensible record of your work.
For the complete UAD 3.6 photo organization workflow, see How UAD 3.6 Changes Appraisal Reports.
Related Articles:

Jon Barrett
Jon Barrett is the founder of Appraiser Machine and has spent over a decade working with independent appraisers. He's built 300+ appraiser websites, co-led a national appraiser mastermind group, and talked with hundreds of appraisers about what's actually working in their practices. He built Appraiser Machine because the operations side of running an appraisal practice was still stuck in spreadsheets and duct tape - and appraisers deserved better.